
Lock & Mint V1 -> V2
Overview
This migration flow covers upgrading a lock and mint token handling mechanism from CCIP v1 to v2 where you have a
LockReleaseTokenPool on Chain A and a BurnMintTokenPool on Chain B. When transferring A→B, tokens are locked on
A and minted on B. When transferring B→A, tokens are burned on B and released on A. It assumes your address is the
registered administrator in the TokenAdminRegistry on all chains.
This guide covers EVM-to-EVM only.
For simplicity, the steps below illustrate a 2-chain setup (Chain A ↔ Chain B). If your token is deployed across more chains (for example, one LockRelease pool on Chain A connected to BurnMint pools on Chain B, C, D), repeat the relevant steps for each remote chain — see Multi-chain considerations.
Out of scope
- Customized token pools
Definitions
- v1 pool: Any pool version 1.5.x or 1.6.x (
LockReleaseTokenPool 1.5.1,BurnMintTokenPool 1.6.0, etc.) - v2 pool: Pool version 2.0.0 (
LockReleaseTokenPool 2.0.0on Chain A,BurnMintTokenPool 2.0.0on Chain B) that you want to upgrade to. - ERC20LockBox: A v2 contract that holds locked token liquidity on behalf of the Lock & Release pool. Constructor:
(address token). In v1, liquidity was held directly in the pool contract. In v2, it's held in the lockbox. The lockbox is a simple token vault — theremoteChainSelectorparameter indeposit/withdrawexists for interface compatibility but is unused internally. All liquidity is pooled together. - Chain A: The chain with the LockReleaseTokenPool (locks tokens on outbound, releases tokens on inbound).
- Chain B: The chain with the BurnMintTokenPool (mints tokens on inbound, burns tokens on outbound).
- TokenAdminRegistry: The CCIP contract where a token ↔ token pool mapping is registered.
Key architectural note: This migration is asymmetric — Chain A requires deploying both an ERC20LockBox and a LockReleaseTokenPool, while Chain B only needs a BurnMintTokenPool. Additionally, there is a liquidity migration step where locked tokens must be moved from the old v1 pool to the new v2 lockbox.
v2 LockRelease pool variants:
| v2 Pool | Lockbox model | Use case |
|---|---|---|
LockReleaseTokenPool | Single shared lockbox (set in constructor) | Standard — all remote chains share one liquidity pool |
SiloedLockReleaseTokenPool | Per-chain lockboxes (configured via configureLockBoxes()) | When you need isolated liquidity per remote chain |
Unlike BurnMint pools (which have variants based on the token's burn interface), LockRelease pools don't need interface
variants — locking and releasing uses standard ERC20 transferFrom/transfer.
This guide uses LockReleaseTokenPool (single shared lockbox) as the standard migration path. For siloed lockboxes,
see the Siloed liquidity section.
Flow diagram
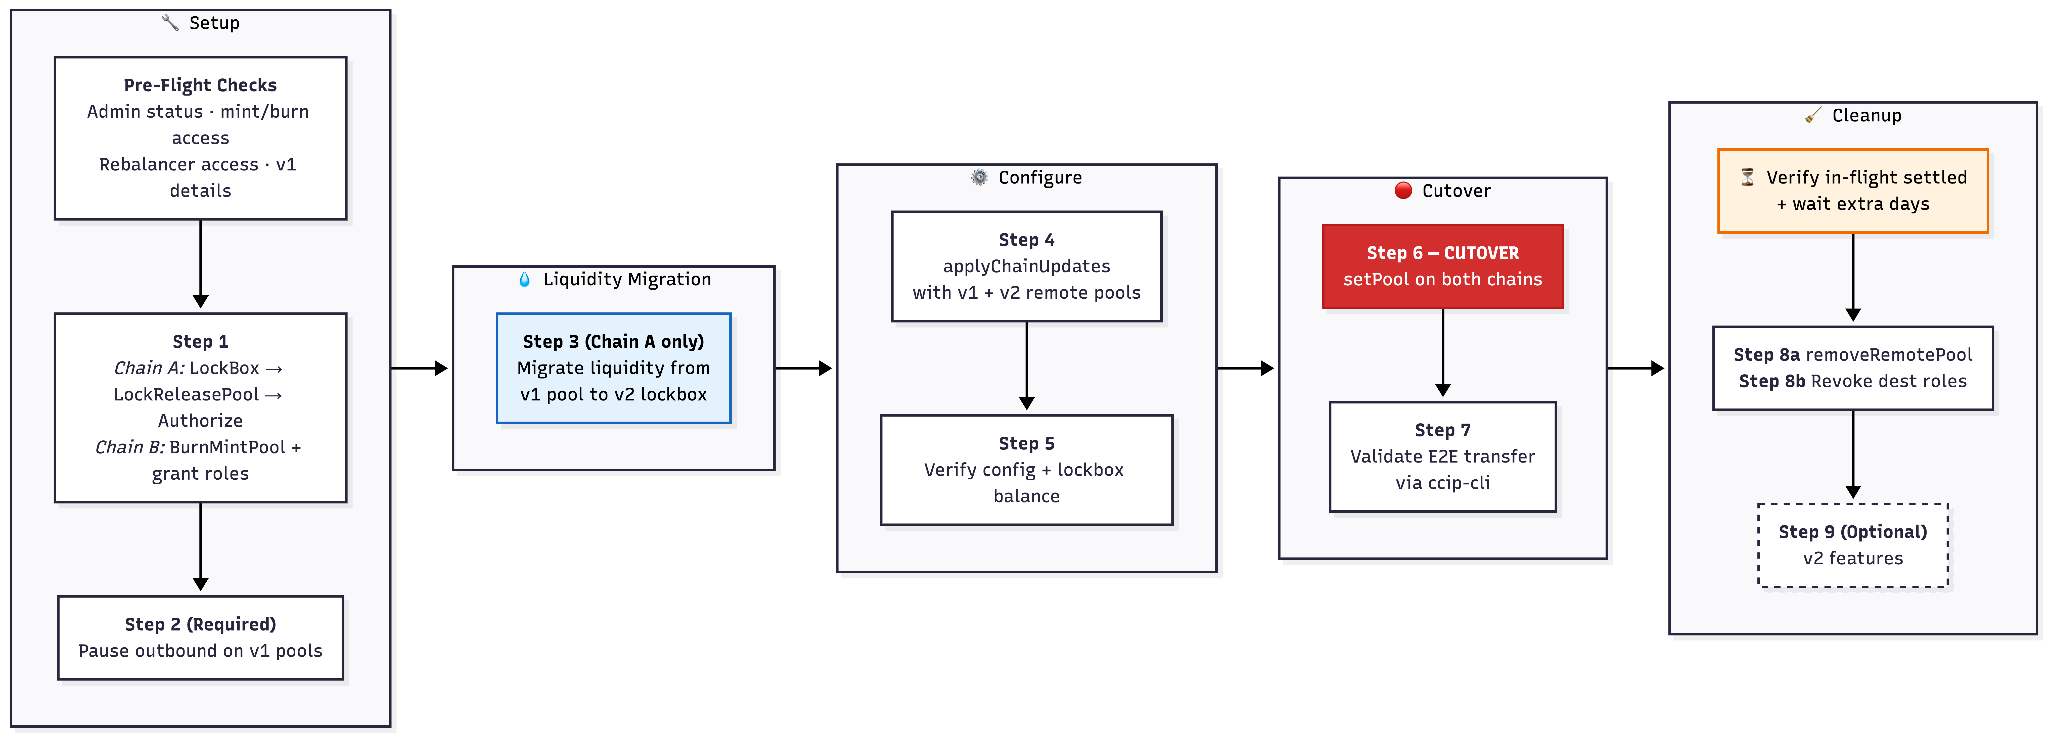
Batching operations
If you control the administrator, pool owner, and lockbox owner addresses through a multisig that supports meta-transactions (for example, Safe), you can batch multiple migration steps into a single atomic transaction.
Recommended groupings:
Batch 1 — Liquidity migration (Chain A)
Steps 3a–3f combined into one atomic transaction:
- On v1 pool:
setRebalancer→withdrawLiquidity - On v2 lockbox:
applyAuthorizedCallerUpdates(add)→deposit - On token:
approve(for lockbox to pull tokens) - Cleanup:
applyAuthorizedCallerUpdates(remove)on v2 lockbox
This is the most critical batch — it eliminates the non-atomic custody window where liquidity sits in your wallet
between withdraw and deposit. You can optionally include setPool (Step 6) in this same batch to combine liquidity
migration and cutover on Chain A in a single atomic transaction.
Batch 2 — Configure + cutover (per chain)
applyChainUpdates (Step 4) + setPool (Step 6). Configures the v2 pool and activates it in one transaction.
Batch 3 — Cleanup (per chain)
removeRemotePool (Step 8a) + revokeMintRole + revokeBurnRole (Step 8b, destination only).
Each batch must be executed per chain — you cannot batch cross-chain operations into a single transaction. Batch 1 runs on Chain A only; Batches 2 and 3 run on each chain separately.
Pre-flight checks
Before starting the migration, verify the following on both chains:
1. Confirm your admin status in TokenAdminRegistry
- Call
TokenAdminRegistry.getTokenConfig(tokenAddress)on both chains. This returns:.administrator— must match the address you control (EOA, multisig, or other account).pendingAdministrator— must beaddress(0)(no pending transfer in progress).tokenPool— the current v1 pool address
- If the administrator is a multisig or timelock, execute subsequent steps through that governance mechanism. If using a multisig like Safe, you can batch multiple steps into a single meta-transaction for atomicity.
- Note: even if
.pendingAdministratoris non-zero, the current.administratorcan still callsetPool. However, resolving the pending transfer before starting is recommended. For example, if an administrator change was intended in the past but no longer relevant,transferAdminRole(localToken, address(0))can be called to cancel the previous transfer.
2. Confirm you can grant mint/burn roles on the Chain B token
- On Chain B, the new v2 BurnMintTokenPool needs mint and burn privileges on the token.
- Verify the address you control can call
grantMintAndBurnRoles(or equivalent) on the Chain B token contract. - This is a hard blocker for Chain B — if you can't grant roles, you can't migrate that side.
- On Chain A, the Lock & Release pool does NOT need mint/burn roles (it locks and releases, it doesn't burn or mint). No role grant is needed on the Chain A token.
3. Confirm you can withdraw liquidity from the v1 Chain A pool
- The v1 LockReleaseTokenPool holds locked token liquidity directly in its contract balance. You need to withdraw this liquidity and deposit it into the new v2 ERC20LockBox.
- Only the rebalancer can call
withdrawLiquidity— the pool owner cannot withdraw directly. If the rebalancer isaddress(0)(never set), liquidity cannot be withdrawn at all. - If the rebalancer is not the address you control, the pool owner can call
setRebalancer(address)(onlyOwner) to change it. A common pattern is to temporarily set the rebalancer, perform the withdrawal, then restore the original rebalancer after (see Step 3). - This is a hard blocker — if the rebalancer is
address(0)and you are not the pool owner (and thus cannot callsetRebalancer), you cannot fund the new lockbox. - Note:
getRebalancerandsetRebalancerare v1 functions. v2 pools do NOT have a rebalancer concept — they use the lockbox + authorized callers pattern instead.
4. Record your existing v1 deployment details
Collect and export the following:
- Token addresses on each chain
- v1 pool addresses on each chain:
- Chain A v1 pool (LockReleaseTokenPool)
- Chain B v1 pool (BurnMintTokenPool)
- v1 Chain A pool liquidity balance: Check the pool's total token balance on a block explorer:
token.balanceOf(v1PoolAddress). - Current rate limiter settings on the v1 pools (inbound and outbound per remote chain). You'll replicate these on
the new v2 pools.
- Read via two separate calls per remote chain (v1.5.x / v1.6.x):
pool.getCurrentInboundRateLimiterState(remoteChainSelector)→ returns the inboundTokenBucket.pool.getCurrentOutboundRateLimiterState(remoteChainSelector)→ returns the outboundTokenBucket.- Each
TokenBucketis{ tokens, lastUpdated, isEnabled, capacity, rate }. The struct is identical across v1.5.1, v1.6.1, and v2.0 — values can be copied directly. - Note: v2 collapses these into a single
getCurrentRateLimiterState(remoteChainSelector, fastFinality)call returning both buckets, but v1 doesn't have that signature.
- Read via two separate calls per remote chain (v1.5.x / v1.6.x):
5. Confirm the token contracts are compatible
- Chain A token: Must be a standard ERC20 (the Lock & Release pool locks/releases, no special interface needed
beyond
transfer/transferFrom). - Chain B token: Must implement
burn(amount)andmint(to, amount)interfaces (for example,IBurnMintERC20).
6. Verify pool ownership model
- After deploying the new v2 pools, the deployer becomes the initial owner.
applyChainUpdatesandremoveRemotePoolrequire pool owner (onlyOwner) privileges.setPoolon TokenAdminRegistry requires TokenAdminRegistry administrator (onlyTokenAdmin) privileges.- If these are different addresses, coordinate accordingly.
Step 1: Deploy new v2 token pools
This step is asymmetric — Chain A and Chain B require different contracts.
Chain A: LockBox + LockReleaseTokenPool
Three sub-steps, executed in order:
1a. Deploy ERC20LockBox
- Deploy an
ERC20LockBoxcontract on Chain A. - The lockbox holds locked token liquidity on behalf of the LockReleaseTokenPool. It must be deployed before the pool.
- Constructor:
constructor(address token) // The ERC20 token address — must not be address(0)
- The lockbox initializes with an empty authorized callers list. Callers are added in Step 1c.
- After deployment:
export LOCK_BOX=0x...
1b. Deploy LockReleaseTokenPool
- Deploy a
LockReleaseTokenPool 2.0.0on Chain A. - Constructor:
constructor(
    IERC20 token,                // existing token address
    uint8 localTokenDecimals,    // token decimals on this chain
    address advancedPoolHooks,   // address(0) to skip, or AdvancedPoolHooks contract
    address rmnProxy,            // RMN proxy address for this chain
    address router,              // CCIP router address for this chain
    address lockBox              // ERC20LockBox address from Step 1a
)
- Pass
address(0)foradvancedPoolHooksif you don't need allowlisting or a policy engine. You can attach hooks later viaupdateAdvancedPoolHooks. - Record the new v2 pool address.
1c. Authorize pool on LockBox
- The new v2 pool must be an authorized caller on the lockbox before it can deposit/withdraw tokens.
- Call
applyAuthorizedCallerUpdates(AuthorizedCallerArgs)on the lockbox (onlyOwner). The struct takes two arrays:
struct AuthorizedCallerArgs {
    address[] addedCallers;    // addresses to authorize
    address[] removedCallers;  // addresses to deauthorize
}
- The deployer is the initial lockbox owner.
- You may also add your timelock or multisig address as an authorized caller if you plan to manage liquidity through governance.
- Verify: call
getAllAuthorizedCallers()on the lockbox and confirm the new pool is listed.
Chain B: BurnMintTokenPool
- Deploy a
BurnMintTokenPool 2.0.0on Chain B. - Constructor:
(IBurnMintERC20 token, uint8 localTokenDecimals, address advancedPoolHooks, address rmnProxy, address router) - Grant mint and burn roles to the new v2 pool on the Chain B token contract.
- Record the new v2 pool address.
Note — dual privilege window: From this point until Step 8b:
- On Chain B, both old v1 and new v2 BurnMint pools have mint/burn roles.
- On Chain A, the old v1 LockRelease pool still holds liquidity and is still registered. The new v2 pool exists but is empty and not yet connected.
State after this step
- Old v1 pools: still active, still routing all CCIP traffic.
- New v2 Chain A pool: deployed, authorized on lockbox, but empty (no liquidity yet) and not connected to CCIP.
- New v2 Chain B pool: deployed, has mint/burn roles, but not connected to CCIP.
Step 2 (required): Pause outbound transfers on old v1 pools
- Set outbound rate limiter to
isEnabled: true, capacity: 1, rate: 0on the old v1 pools on both chains. This effectively blocks all transfers: the capacity allows at most 1 unit (smallest token denomination) and the zero rate means the bucket never refills. This works across all pool versions (v1.5.x through v2).- Do NOT use
isEnabled: false— this disables rate limiting entirely, allowing unlimited transfers.
- Do NOT use
- This blocks new cross-chain transfers while the migration completes, creating a brief maintenance window.
- Keep inbound open so in-flight messages can still arrive and be processed.
For Lock & Mint migrations, pausing is strongly recommended (not just optional). Unlike Burn & Mint, Lock & Mint has a liquidity migration step (Step 3) that drains the v1 pool. If you don't pause:
- New tokens can get locked in the old v1 pool between Step 3 (drain) and Step 6 (cutover).
- These tokens are stranded — they're not in the v2 lockbox, so the v2 pool can't release them.
- This creates a liquidity accounting mismatch: the v2 lockbox is underfunded relative to the total locked tokens.
- Reverse (Mint→Lock) messages could fail if the lockbox doesn't have sufficient funds.
If you can batch steps atomically (for example, via a Safe multisig meta-transaction), this window is eliminated. If you cannot batch atomically (for example, executing from a plain EOA), pausing is the safest approach.
Trade-off: Pausing = prevents stranded liquidity, clean accounting, safe cutover. Not pausing = zero downtime but risk of stranded tokens and underfunded lockbox.
Step 3: Migrate liquidity to LockBox (Chain A only)
This step is unique to Lock & Mint migration. In v1, the Lock & Release pool held liquidity directly in its contract
balance. In v2, liquidity sits in the ERC20LockBox. You must move it.
Warning — non-atomic execution risk: If you execute steps individually (not batched), the withdraw → approve → deposit sequence is NOT atomic. Between withdraw and deposit, the full liquidity sits in your wallet. If the account is compromised or the deposit fails, tokens are at risk. Mitigations: batch all sub-steps atomically via a Safe multisig meta-transaction or similar account abstraction, or use a hardware wallet if executing individually.
Migration sequence
3a. Set rebalancer on old v1 pool
- Read the current rebalancer via
pool.getRebalancer(). - Call
setRebalancer(yourAddress)on the old v1 pool to grant your address withdrawal rights. This requires pool owner privileges. - If your address is not the current rebalancer, call
setRebalancer(yourAddress)on the old v1 pool (onlyOwner) to grant your address withdrawal rights.
3b. Withdraw liquidity from the old v1 pool
- Read the old pool's token balance:
token.balanceOf(v1PoolAddress). This is the total available for migration. - Call
withdrawLiquidity(amount)on the old v1 LockReleaseTokenPool. This function is callable only by the current rebalancer (set in Step 3a). - Full withdrawal (recommended if you paused in Step 2): Withdraw the entire balance. Since outbound is paused, no new locks are arriving and in-flight releases have settled.
- Partial withdrawal (alternative if you did NOT pause): Withdraw a portion (for example, 80%) and leave the remainder to cover any in-flight release messages still pending on the old pool. You can perform a second migration later to move the remaining liquidity once in-flight messages have settled. This avoids downtime but requires monitoring.
- The withdrawn tokens are transferred to the rebalancer's address.
Caution: Any tokens left in the old v1 pool after setPool (Step 6) will not be accessible by the new v2 pool. If
you fully drained, verify token.balanceOf(v1PoolAddress) = 0.
3c. Add your address as authorized caller on the lockbox (temporarily)
- Call
applyAuthorizedCallerUpdateson the lockbox, adding your address as an authorized caller. - This is required because only authorized callers can call
deposit. - This authorization is temporary — you will remove it in Step 3f after the deposit.
3d. Approve the lockbox to spend tokens
- Call
token.approve(lockboxAddress, amount)on the Chain A token contract.
3e. Deposit tokens into the ERC20LockBox
- Call
lockbox.deposit(tokenAddress, 0, amount)to deposit the tokens into the lockbox. - The
remoteChainSelectorparameter (second arg) is unused by the ERC20LockBox contract — pass0or any value. The lockbox is a simple token vault shared across all remote chains.
3f. Remove your address from authorized callers (cleanup)
- Call
applyAuthorizedCallerUpdateson the lockbox, removing your address from the authorized callers list. - This minimizes the attack surface — only the pool should remain as an authorized caller.
Post-migration verification
After completing the deposit, verify:
token.balanceOf(v1PoolAddress) = 0(v1 pool is drained)token.balanceOf(lockboxAddress)equals the total withdrawn amount
State after this step
- Old v1 Chain A pool: drained (no liquidity).
- New v2 lockbox: funded with the migrated liquidity.
- New v2 pools: still not connected to CCIP routing.
Step 4: Configure new v2 pools (applyChainUpdates)
On each chain, call applyChainUpdates on the new v2 pool to configure remote chain connections.
Function signature
function applyChainUpdates(
    uint64[] calldata remoteChainSelectorsToRemove,
    ChainUpdate[] calldata chainsToAdd
) external onlyOwner
Each ChainUpdate contains:
remoteChainSelector(uint64)remotePoolAddresses(bytes[]) — array of remote pool addressesremoteTokenAddress(bytes) — the token address on the remote chainoutboundRateLimiterConfig(isEnabled, capacity, rate)inboundRateLimiterConfig(isEnabled, capacity, rate)
Remote pool addresses — include both old and new
The remotePoolAddresses array must include both the old v1 pool and the new v2 pool on the remote chain.
Multiple pools per remote chain are supported — the contract stores them additively.
Note the asymmetric pool types:
- Configure Chain A pool (LockReleaseTokenPool):
- Remote chain = Chain B
remotePoolAddresses = [encode(v1ChainBBurnMintPool), encode(v2ChainBBurnMintPool)]
- Configure Chain B pool (BurnMintTokenPool):
- Remote chain = Chain A
remotePoolAddresses = [encode(v1ChainALockReleasePool), encode(v2ChainALockReleasePool)]
Address encoding: remotePoolAddresses is typed as bytes[] and remoteTokenAddress as bytes — the contract
stores whatever bytes you pass with no format validation beyond a non-zero-length check.
- EVM remote chain: left-pad the 20-byte address to 32 bytes. In Solidity:
abi.encode(poolAddress). In Go:common.LeftPadBytes(addr.Bytes(), 32). Both produce the same 32 bytes — the 20-byte address right-aligned with 12 leading zero bytes.
Why both pools must be listed: Messages sent through the old v1 pool before the cutover may still be in-flight. The OffRamp validates that the source pool address in the message matches a configured remote pool on the destination. Without the old pool in the list, in-flight messages fail validation.
Rate limiter configuration
- Rate limiters are configured atomically as part of
applyChainUpdates. - Replicate your existing v1 rate limiter settings (or adjust as needed for v2). The struct is identical between v1 and v2.
- Configure both inbound and outbound rate limits per remote chain.
- If you paused transfers in Step 2, set the v2 pool rate limits to your desired production values (not zero — the v2 pool needs to be ready to handle traffic after cutover).
- Note: setting
isEnabled: falsemeans unlimited transfers (no rate limiting). SetisEnabled: truewith appropriate capacity and rate to enforce limits.
Error recovery
applyChainUpdates reverts with ChainAlreadyExists if the remote chain is already configured. You cannot call it
twice for the same chain. If you need to fix a misconfiguration after the initial call:
- Add a missing remote pool: call
addRemotePool(remoteChainSelector, encodedRemotePoolAddress)(onlyOwner) — second arg isbytes, encoded as described above. - Remove a wrong remote pool: call
removeRemotePool(remoteChainSelector, encodedRemotePoolAddress)(onlyOwner) — pass the same bytes that were stored when adding. - Change rate limiters: call
setRateLimitConfig(RateLimitConfigArgs[])(onlyOwneror rate limit admin). - Fully reconfigure a chain: first remove it via
applyChainUpdates([chainSelector], []), then re-add it with the correct configuration.
Step 5: Verify new pool configuration
Before cutting over, verify the new v2 pools are correctly configured on both chains.
Chain A (LockReleaseTokenPool):
- Remote chain configs include both old v1 and new v2 Chain B BurnMint pool addresses.
- Remote token address is correct (Chain B token).
- Inbound and outbound rate limiters match your intended settings.
- Pool is authorized caller on the lockbox (
lockbox.getAllAuthorizedCallers()includes pool). - Lockbox has the correct liquidity balance (
token.balanceOf(lockboxAddress)matches expected total). - Pool owner is the address you control (
pool.owner()).
Chain B (BurnMintTokenPool):
- Remote chain configs include both old v1 and new v2 Chain A LockRelease pool addresses.
- Remote token address is correct (Chain A token).
- Inbound and outbound rate limiters match your intended settings.
- The v2 pool has mint and burn roles on the token (verify via the token contract's role-checking functions).
- Pool owner is the address you control (
pool.owner()).
Both chains:
-
TokenAdminRegistry.getTokenConfig(token).pendingAdministratorisaddress(0). - v1 pool is paused (if Step 2 was executed) — verify
token.balanceOf(v1PoolAddress) = 0(no new locks since drain).
Verify before proceeding — setPool in the next step routes live traffic through the v2 pools.
Step 6: Activate new v2 pools (setPool) — the cutover
- On each chain, call
TokenAdminRegistry.setPool(tokenAddress, newV2PoolAddress)to point the registry to the new v2 pool. - Call
setPooldirectly — your address is already the registered administrator. Do not callproposeAdministratororacceptAdminRole; these are only for initial registration, not for pool upgrades. - Once executed on a chain, all new CCIP transfers for this token on that chain route through the new v2 pool.
- Execute on both chains. The order does not matter because of the dual remote pool configuration from Step 4.
What happens to in-flight messages after cutover
- Messages sent through the v1 pool before
setPoolwill still arrive at the destination. - The destination's new v2 pool recognizes the old v1 remote pool address (configured in Step 4), so these messages validate and execute correctly.
- For in-flight Lock→Mint messages: If you paused in Step 2 and withdrew the full balance in Step 3, no residual tokens should be in the v1 pool. If you did NOT pause, any tokens locked between Step 3 and this cutover remain in the v1 pool and are NOT in the v2 lockbox — creating a liquidity accounting mismatch (see Step 2 for why pausing is strongly recommended).
Rollback: If issues arise, you can call TokenAdminRegistry.setPool(tokenAddress, oldV1PoolAddress) to revert to
v1. However, for Lock & Mint:
- The v1 Chain A pool has been drained in Step 3. You would need to re-fund it via direct token transfer before it can
process new releases. (
provideLiquiditydoes not exist in the contract source.) - Any in-flight messages sent through the v2 pool will fail validation on the v1 destination (since v1 pools were not configured with v2 remote pool addresses).
- Rollback before Step 6 is simpler: the tokens are in the v2 lockbox and can be recovered via
lockbox.withdraw(). Rollback after Step 6 is significantly harder due to split liquidity state.
Step 7: Validate end-to-end
- Send a cross-chain token transfer using
ccip-cli: tokens should be locked on Chain A (in the lockbox) and minted on Chain B.ccip-cliuses the CCIP SDK and queriesapi.ccip.chain.linkto track message status end-to-end. - Verify the transfer completes successfully on Chain B.
- Confirm the transfer was routed through the new v2 pool (check transaction logs).
- Test the reverse direction (Chain B → Chain A): tokens should be burned on Chain B and released from the lockbox on Chain A.
Step 8: Post-migration cleanup
Important: If you paused outbound in Step 2 and waited for in-flight messages to settle before draining, there
should be no pending messages by this point. Verify via CCIP Explorer or ccip-cli (which
queries api.ccip.chain.link — will soon support filtering by source token address) that all messages from the old v1
pool addresses show SUCCESS status.
Note: Steps 8a and 8b are optional. The old pools are already inert (removed from TokenAdminRegistry) and pose minimal risk if cleanup is deferred. If you performed a partial drain (left some liquidity in the old v1 pool for in-flight releases), wait until those remaining messages have settled before removing old remote pool addresses.
8a. Remove old v1 remote pool addresses from the new v2 pools
Call removeRemotePool(uint64 remoteChainSelector, bytes calldata remotePoolAddress) (onlyOwner) on each chain:
- On Chain A pool: remove the old v1 Chain B BurnMint pool from the remote pool list.
- On Chain B pool: remove the old v1 Chain A LockRelease pool from the remote pool list.
Caution: If any in-flight messages from the old v1 pools are still pending, removing their remote pool address will
cause those messages to fail validation. If this happens, re-add the address using
addRemotePool(uint64 remoteChainSelector, bytes calldata remotePoolAddress) (onlyOwner) to unblock it.
8b. (Optional) Revoke old pool privileges
Chain B:
- Call
revokeMintRole(oldV1DestPoolAddress)andrevokeBurnRole(oldV1DestPoolAddress)on the Chain B token contract (if supported, for example,BurnMintERC677).
Chain A:
- The old v1 Lock & Release pool does not have mint/burn roles — no revocation needed.
- The old v1 Chain A pool is drained and removed from TokenAdminRegistry. It is inert.
State after cleanup
- v2 pools: active, routing all CCIP traffic, only v2 remote pools configured.
- v2 lockbox: holds all locked liquidity for Chain A.
- v1 pools: orphaned, not in TokenAdminRegistry, drained (Chain A) / no mint roles (Chain B, if revoked).
Step 9 (optional): Explore v2 features
v2 pools support additional configuration not available in v1:
Advanced pool hooks
- Deploy a separate
AdvancedPoolHookscontract and attach it to your pool viaupdateAdvancedPoolHooks(IAdvancedPoolHooks newHook)(onlyOwner). - Alternatively, pass the hooks address in the pool constructor at deployment time (Step 1).
- If you don't need these features, leave the hooks address at
address(0)(the default). AdvancedPoolHooks is fully optional. - Constructor:
(address[] allowlist, uint256 thresholdAmountForAdditionalCCVs, address policyEngine, address[] authorizedCallers) - Capabilities:
- Allowlisting: Restrict which addresses can initiate transfers (moved from pool constructor in v1 to hooks in
v2). Managed via
applyAllowListUpdates(address[] removes, address[] adds)(onlyOwner). - CCV (Cross-Chain Verifier) management: Configure per-chain verifiers for inbound and outbound transfers via
applyCCVConfigUpdates(CCVConfigArg[])(onlyOwner). - Threshold amount for additional CCVs: Set via
setThresholdAmount(uint256)(onlyOwner). When a transfer amount meets or exceeds this threshold, additional CCVs are required on top of the base CCVs — providing tiered security for high-value transfers. Set to0to disable (only base CCVs apply regardless of amount). - Policy engine: Attach a custom policy contract for pre-flight/post-flight validation via
setPolicyEngine(address)(onlyOwner).
- Allowlisting: Restrict which addresses can initiate transfers (moved from pool constructor in v1 to hooks in
v2). Managed via
Fast finality (FTF)
- Call
setAllowedFinalityConfig(bytes4 allowedFinality)on the v2 pool (onlyOwner) to enable fast finality. The defaultbytes4(0)means the pool only accepts full-finality transfers; any non-zero value opts the pool into fast finality (either safe-head flag, minimum block-depth, or both). Read the current value viagetAllowedFinalityConfig(). - When fast finality is enabled, the pool maintains two separate rate limiter buckets per remote chain: one for default (wait-for-finality) transfers and one for fast-finality transfers.
Rate limits
- v2 pools support separate rate limits for default (wait-for-finality) and fast finality per remote chain.
- Call
setRateLimitConfig(RateLimitConfigArgs[])(onlyOwneror rate limit admin) to configure rate limits. EachRateLimitConfigArgsincludes abool fastFinalityflag to target the default or fast-finality bucket. - To read current rate limits:
getCurrentRateLimiterState(remoteChainSelector, fastFinality)— passfalsefor the default (wait-for-finality) bucket,truefor the fast-finality bucket.
Token transfer fee configuration
- v2 pools have a pool-level fee override mechanism. Call
applyTokenTransferFeeConfigUpdates()on your pool (onlyOwner) to configure per-destination-chain fees. - Fees support separate rates for default and fast finality:
finalityTransferFeeBps/finalityFeeUSDCents— for default (wait-for-finality) transfersfastFinalityTransferFeeBps/fastFinalityFeeUSDCents— for fast-finality transfers
- These pool-level fees override the global defaults set by Chainlink on the FeeQuoter contract. If you don't configure
pool-level fees (
isEnabled: false), the FeeQuoter defaults apply. - To withdraw accrued fees, call
withdrawFeeTokens(address[], address)on the pool (onlyOwnerorfeeAdmin).
Rate limit admin & fee admin delegation
- Call
setDynamicConfig(address router, address rateLimitAdmin, address feeAdmin)on the v2 pool (onlyOwner). - There is no separate
setRateLimitAdminfunction — all three are set together (pass the current value for any field you don't want to change; for example, router). - The rate limit admin can call
setRateLimitConfig()to modify rate limits without full pool ownership. - The fee admin can call
withdrawFeeTokens(address[], address)to withdraw accrued fees without full pool ownership.
Pool & lockbox ownership transfer (recommended for production)
- Transfer pool ownership to a multisig or timelock contract after migration.
- Transfer lockbox ownership as well, and remove your address from authorized callers.
- This ensures all future configuration changes require governance approval.
Multi-chain considerations
3+ chain deployments
For tokens deployed across 3+ chains, you typically have one LockReleaseTokenPool on Chain A and BurnMintTokenPools on each additional chain (Chain B, C, D, etc.):
- The Chain A LockRelease pool must configure remote pool entries for all remote chains (both old v1 and new v2 BurnMint pools on each).
- Each remote BurnMint pool must configure remote pool entries for Chain A's old v1 and new v2 LockRelease pool addresses.
- Liquidity migration (Step 3): The ERC20LockBox is a shared vault — one withdrawal and one deposit covers all remote
chains (the
remoteChainSelectorparam is unused).
Siloed liquidity (per-chain isolation)
If you need per-chain liquidity isolation, use SiloedLockReleaseTokenPool instead of LockReleaseTokenPool:
- No lockbox in constructor — configure per-chain lockboxes via
configureLockBoxes(LockBoxConfig[])(onlyOwner). - Each remote chain can have its own ERC20LockBox instance.
- Liquidity migration differs from the standard flow:
- Use
withdrawSiloedLiquidity(remoteChainSelector, amount)per remote chain (instead ofwithdrawLiquidity). - Each siloed chain has its own rebalancer — set and restore per chain via the pool's silo rebalancer functions.
- Authorize, approve, and deposit into each chain's lockbox separately.
- Also handle any unsiloed liquidity separately.
- Use
Gradual migration
You can migrate remote chains sequentially. Chain A's v2 pool can serve both migrated (v2) and not-yet-migrated (v1) destinations simultaneously, as long as all remote pool addresses are configured.